
1. Start your new post as normal.
2. Click on the HTML tab as shown in this here very clever screen shot!

3. Now cut and paste this next bit of code into the draft post:-

4. Now click on the picture icon and upload the first picture to your post ... put it a little way down the page ... you will see why in a moment.


5. Highlight that complete code and cut it and then paste it carefully over the bit in the script that says "FIRST PICTURE"

6. Repeat step 4 and 5 ... only this time paste over "SECONDPICTURE"

7. Now click on the Compose tab.

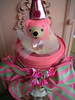
8. Your post should look a bit like this ... only with your own pictures :0)

Your mission should you choose to accept it is to follow this toot ... then come back and link your post in the comments so we can all admire your handy work!
Good Luck!
Laters!


18 comments:
Wahooooo I've tried it and it works. You are soooooo clever. I will use it on my blog soon :-)
Hugs,
A x
Thank you for this Linda, I'll definitely give it a go.
Very interesting and useful bit of HTML code Linda.....must have a go !
Mine's only partly worked - part of my right hand picture has got cut off... different template design probably.. but it's well worth knowing. Thankyou!
I did it! I did it! I must have the old interface of blogger, but it still worked....by the way, I laugh everytime Sir Tim slides into the frame....
http://georgie-hornpuddinnpie.blogspot.com/2012/02/howd-you-do-that.html
I shall be back to re read the instructions ...several times ...before I have a go . i normally just do a collage ...but I like the look if this.
Hugs... for the reflections xx
You are brilliant! Thanks so much for posting this-- what a great tutorial!
Hugs from the other Linda
What a star you are!! I will need to have two windows open to achieve this... but i will give it a go and let you know!!
yea it works! thanks for the code :))
xx
Thank you for the tutorial, will try it when my brain is ready!!
Thanks for this - will need to try it out
wow!! you are fantastic!! exactly what I needed!! thank you!!
Thanks so much for this :)
Thanks so much for this :)
How can we add more pictures? Do we just use the same code because that will just make another side by side instead of 3 or 6 together. Also i tried to change the width but nothing happen. How can we use this to make thumbnail sizes?
Yay!! It worked!! (Well kinda, it's sticking out the side a bit but that could just be my netbook hopefully it looks right on a proper computer)
So new to blogging I haven't got a clue on how to do anything!!
But this I managed, what a great and easy to use tutorial! thanks
http://alteredermie.blogspot.com/2012/03/march-calendar-challenge.html
THANK YOU SOOOOO MUCH!!!! I was beyond frustrated with my blog and trying to get the pictures side by side, since the blog was already going to be long I didn't want it to be even longer with pictures stacked on top of each other in a single line. It worked absolutely perfectly! Best explanation/tutorial/guidance out there!! =D
Hi Nice Post With Clear Screen Shots Awesome like ur blog and posts
Post a Comment